
Kegging, Carbonating and Bottling
Kegging Using A Cornelius Keg
For many years I have used the familiar plastic barrels, which I am sure that most home brewers have used at one point. I have also managed to produce some very drinkable beer using these barrels but there were quite a few reasons why I have now stopped using them.
The best option available for home brewers is the Cornelius Keg, see the equipment page for full details. These were originally used by the soft drinks industry who have now phased them out in preference to the bag in the box system. This means there are lots of second hand Corny Kegs available. These have many advantages, which are detailed on the equipment page, so take a look and get converted.
Another option would be to use the full size Sankey Kegs, which are used by the brewing industry but these are very large and not that easy to keep clean. I am not saying that you would be unable to use these Kegs, they are just not as practical as the Corny.
Now that you have decided to use the Cornelius Keg (you have, haven't you?) lets look at how you will use these in more detail.
Things you need to Know before we proceed
- The Corny Keg will hold just over 4 UK Gallons. This is obviously less than most beer kits will make so you will need to work out what you are going to do with that extra Gallon. In practice, it seems that about 6 pints needs to be stored in another vessel as 4 Gallons and 2 Pints will actually fit in the Corny Keg with enough room left at the top. The best way is to siphon the 6 pints into separate pint bottles and crown cap them. I used to hate bottling beer as it is a real pain to sterilise, rinse, fill and cap 40 pint bottles. However, as we are only going to need 6 bottles this is OK and gives you the opportunity to share some with friends and family.
- As the Corny Keg has a dip tube, which extends right down to the bottom of the Keg, we cannot secondary ferment or Keg cloudy beer. This means that the beer has to be cleared in a secondary vessel and then carbonated using CO2 once in the Keg. If you Keg cloudy beer, the dip tube will suck all the yeast sediment up when serving, which is not too pleasant. This does have some obvious advantages, you have less yeasty sediment in the Keg and the dip tube will extract all but the last 8th of a pint, so no wastage.
- Gas - You are going to need a lot more gas than you are used to with those plastic barrels. As we are not secondary fermenting, we need to force carbonate using CO2. This can obviously get quite expensive using homebrew gas, such as Widget World, so the best way forward is a pub style cylinder. If you can get one of these they work out very cheap and last forever compared to Home brew ones. See the equipment page for more details.
Cleaning / Sterilizing
Most people will tell you to use something like VWP, which is a great bleach based cleaning and sterilizing solution. I use this for sterilizing most of my equipment but it is not really suitable for use on stainless steel. To be honest, I am sure that as long as you keep the contact to the minimum time required you are probably OK, so do not panic about this. If you read the American forums, they all seem to use something called "Iodophor", which is an iodine based sterilizer that can be safely used with stainless steel. In fact the dairy industry use this method of sterilising for their milk storage vessels. Unfortunately Iodophor is not commonly available in the UK in small quantities, so we need an alternative. I have read that some people are using Viadene but this has not been approved for use with food based products, so I personally would steer well clear of this despite people telling you it is safe. There is no point in damaging your health unnecessarily.
In the UK I have found 2 options:
- Star San - This is an acid based cleaner/sterliser but you cannot use this with hard water. The 'No Rinse' concentration is 1.6ml of Start San per Litre of water. If your solution goes cloudy, then you will need to use spring water (Tesco Ashneck works well).Star San foams like crazy and this is intentional as the foam sterilises everything it touches. It can be a bit of a pain when kegging, so I usually go for option 2 below. Star San is great mixed up in a spay bottle from which you can spay it all over any piece of kit to sterilise it. On a brew day I mainly use Star San for Misc Equipment / Fermenter / Boilers and anything else that needs quick easy sterlising.
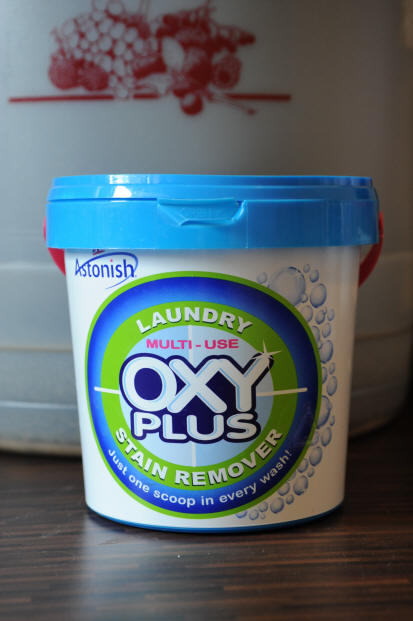
- IoStar - This is an iodine based sterilizer, similar to Iodophor. If used in the correct measures it is a no rinse solution, although I have always rinsed it out, just to be safe. Rinsing does bring the risk of introducing new germs but I am willing to accept this. The only disadvantage of this product is that it only sterilizes, you still need to clean the Kegs first. I have found some forum posts, which suggest using oxygen based cleaning products. I have used Oxy Plus and can confirm that this works very well.
How to sterilise your Corny
I have tried a few different cleaning regimes with my Corny's but have settled on the process described below. To date I have not had a single infection, so I will continue with the method below.
- First just give the corny a good rinse with hot water. DO NOT use washing up liquid, these detergents kind are difficult to wash away and kill the head on your beer.
- Put a couple of scoops of OXY Plus in your Corny and half fill with hot water.
- Seal the Corny lid and give a good shake.
- You should have some pressure in the Keg now so we can slight depress the poppit valves on the disconnect posts, to get some of the solution into them. For the inlet post you will need to turn the corny upside down. Remember to also pull the release valve and let some of the solution into this component as well.
- Leave for 10-20 minutes shaking occasionally.
- Connect Gas to keg and an outlet disconnect and force the solution out via the dip tube. This is to remove any bits stuck in the dip tube.
- Now rinse Corny with warm water again. Seal and force some clean water through the dip tube by pressurising the keg a little.
- Mix up some IO Star solution and add this to the Keg. Repeat the procedure for ensuring that the solution reaches the inlet and outlet posts plus the pressure release valve. Leave for about 10 minutes and then empty solution into another Keg for sanitising or discard.
- IO Star can be left to dry and does not need to be rinsed if used in the correct proportions, which leaves a completely sterile Keg. However, I prefer to rinse with some boiling water as well.
- Corny is now ready to fill with beer

Filling your Keg
OK, so we know that the Keg will not take a full 5 Gallons of beer so we need to consider bottling the balance. It is easier to do the bottling first as you can leave the siphon tube in the fermenter unattended while you work on filling bottles. If you fill your Keg first you will struggle to fill bottles while also trying to avoid sediment in the fermenter. I have found that 6 pint bottles is enough to be able to get the balance in a 4 Gallon Corny. The other alternative is to look at increasing your brew length to 38L, which would fill 2 Corny Kegs.
Assuming we have done our bottling we now need to just siphon the beer into the Keg. Use a long enough siphon tube to reach the bottom of the Keg, you do not want to introduce air at this stage. Be careful when you reach the bottom of the Fermenter as you do not want to pick up any yeast slurry and transfer it to your Keg.
Once the Keg is full with beer, we now need to seal and purge out the air. To get a good seal, I recommend putting a small amount of petroleum jelly on the sealing rubber ring. Ensure your cap is locked in place centrally or you will not get a good seal. Now set your regulator to 10psi and pressurise the Keg, you should hear the lid creaking as it seats itself in place.
The next step is to purge the unwanted oxygen out from the Keg. Co2 is heavier than air so this will push the air to the top of the Keg. Pulling the pressure relief valve will enable the air to be released from the Keg. It is best to do this 3 to 4 times with a few minutes in between each purge. This will ensure that there is no air left in the Keg.
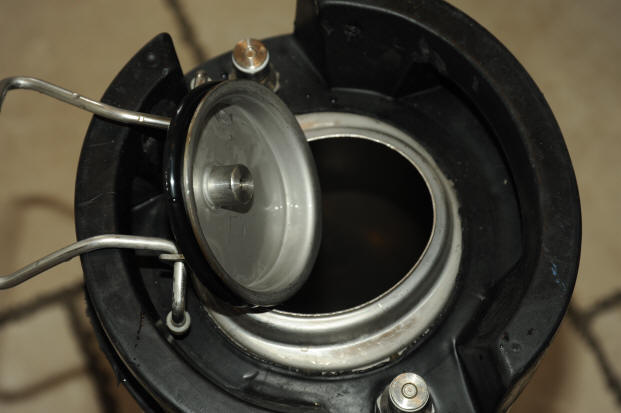
Now that our beer is safe in the Keg, we can force carbonate and condition for a couple of weeks before drinking
Carbonation
With the plastic homebrew barrels we had no choice but to secondary ferment the beer. This had varying results and usually meant that by the bottom of the barrel the beer tasted very stale. By using a Corny and a regulator we can "Force Carbonate" our beer to the desired level and maintain this until the last drop is drawn from the Keg.
The first thing we need to decide is how much carbonation we want in our beer. Real Ales will generally have a low level whereas lagers will be better at a higher level. The volumes that you should be aiming for are somewhere between 1.5 and 3.0 depending on beer type and personal taste.
The next thing to consider is at what temperature your beer will be stored. Co2 is absorbed into a liquid more readily at lower temperatures. If you are storing your beer in a very cool place you do not need to pressurise your Keg to a high psi to obtain a good level of carbonation. However, if your beer is at room temperature then expect to be at the higher pressure range of around 30psi. The PDF chart below, which was from www.homebrew.com, details the pressure required at a given temperature to be able to obtain the desired carbonation level. In reality I have found that this can be a bit hit and miss, so use this as a guide and then experiment.

Carbonation Pressure Chart
Once you have decided on a pressure setting, there are a couple of methods that can be used to force carbonate:
- Agitation
- Patience
Using this method you can carbonate your beer within about 30 minutes. To do this you will need to lie the corny on its side and gently rock it back and forth. This encourages the Co2 to absorb into the beer quickly. This method has the obvious advantage of being able to drink your beer within 30 minutes of Kegging but given that most of the time you will want to allow a couple of weeks for conditioning, it is not a great benefit. There is one big disadvantage with this method, there is a high risk of letting beer into you gas line with all the shaking about. The beer in the gas line will go stale and could even damage your regulator. This method also leaves the beer with large bubbles (like coke), which I do not like. Therefore, I do not use this method.
This is the easy method and requires nothing more than patience. As we should condition the beer for a couple of weeks we can wait for the carbonation to take place. All we do for this method is set the pressure and leave with the gas/regulator switched on for 3-4 days or longer. The Co2 will slowly absorb into the beer and your regulator will keep the pressure topped up as this occurs. I also find that the slow carbonation produces a beer with much finer bubbles, which is better for ales.
The Finished Product

Here is my Keg filled with a Summer Lightning clone, which I have called Summer Thunder.
I generated the labels using MS Publisher for my bottles but they are also handy for sticking to the Keg. More on labels in the bottling section.
Bottling
What type of bottles?
Obviously there are many different types of bottles available for us to use but not all of them are suitable. Some glass bottles are of low quality therefore not be suitable for re-use. The type of neck that the bottle has is also important as some do not work with the standard crown capping tools provided by the homebrew retailers. The best bottles to use are the ones you see in the supermarket in the real ale section. These bottles are usually 568ml, which is basically a pint and are made of reasonable quality glass. Be careful which ones you try and use though as some have a very small collar around the neck. If you look at the picture below you will see all the bottles have a collar of about 3/4 of an inch. Some bottles such as those used by Old Specked Hen (great ale by the way) only have a collar of about 1/2 an inch, which makes it difficult to seal the crown caps without cracking the bottle.
If you are not keen about using glass (in case of accidents / explosions) then another alternative is the plastic soft drink bottles. These are able to withstand very high pressures and therefore can easily withstand the kind of pressure we use for secondary fermentation of homebrew. The downside of these bottles is that they do not look very pretty. The Human brain seems to make very quick decision about something, based on the way it looks. This can mean that when friends see old coke bottles full of beer they will immediately say "I think I will give it a miss mate", although this may be a good thing.
Bottling can be a real pain in arse. If you have ever bottled 40 pints of beer into pint bottles you will know that this seems to take forever. However, if you use a Corny and only have to bottle 6 pints, this becomes more of a pleasure. You now have something that you can share with family and friends or put to the back of the cupboard and allow to condition. Beer sealed in bottles will last much longer than Kegged beer, this means you can keep your best beer for a special occasion.
Sterilising
For sterilising glass bottles we do not need to worry about what we use. For this reason, I stick with VWP, which cleans and sterilises in one go. When I pour beer out of one of my bottles, they are immediately well rinsed to ensure that nothing has stuck to the insides. This means that when we come to sterilise the bottles are already fairly clean.
Another option is to use one of the "No Rinse" sterlisers, such as Star San. This makes the sterlising process much quicker BUT you have to make sure your bottles are clean first as this does not clean.
Fill a bucket with sterilising solution and chuck all the items you need for bottling into the bucket. I then use the Siphon and my Phil's Filler (Beer Gun) to siphon the sterilising solution into each bottle. Wait 10-15 minutes, then empty the bottles and rinse well. They are now ready for filling with beer!

Priming
How much sugar you need for priming can be personal taste. It all depends on the level of carbonation that you like in your beer. However, be careful, over priming leads to explosions, huge sticky messes and unhappy wives. Beer is sticky stuff and takes forever to clean up, so bear this in mind.
There is a certain amount of trial and error here but if you stick to half a teaspoon of sugar per pint bottle you should be OK. The easiest way to get the sugar into the narrow bottle necks is to use a plastic funnel, which makes the job easy.
Filling/Capping
You can use a standard siphon tube with a tap to fill your bottles but this does seem to introduce a lot of air into the bottle, which is not good and can lead to foaming. A better solution is to use an in line tap which will allow you to get the siphon tube down into the bottom of the bottle.
The best option is to use what is called a beer gun, which make filling quick and easy. This tool has a trigger for releasing the beer into the bottle and a long tube to get right to the bottom of the bottle. These can be a bit expensive so you only want to get one of these if you are doing a lot of bottling.
Fill your bottles to within 1" of the top and cap using crown caps. Crown caps are very cheap and the tool for sealing them is also relatively cheap (around £10). The crown caps give a professional finish which you will be proud of. Now you just need to add a label to ensure you know what you have in the bottle, see below for more detail.
Conditioning / Clearing
Now that you have your beer in the bottles you can relax and wait for them to condition. Keep the bottles somewhere warm (20c) for the first week and then find somewhere cooler to store the bottles while the beer is clearing. Your beer will not clear if you store it too warm or too cold. I have put beer in the shed before in the winter to find that it has not cleared 6 weeks later. This can be due to something called chill haze, which affects ales. If this happens don't panic, just move the bottles somewhere warmer and they will recover.

Labels:
After bottling your beer you will want to keep a note of what is in each bottle. The obvious way to do this is to create some labels, which gives your beer a really professional finish. If this is a step too far for you another way is just to use white masking tape, which you can then write on.
If you want to make labels, the first thing to consider is what paper to use and how you will stick the labels to the bottles. I would not recommend using the sticky labels that you can buy for printers from stationery shops as these are very difficult to remove. What I normally do is use plain paper, most people have this handy already and Pritt Stick. This is easy and means that the labels will easily soak of when you want to re-use the bottles. Some people use milk to stick their lables on and this does work but I have never had as much success with this method.
To make the labels themselves I have used MS Publisher to design and print Avery style labels onto plain A4 paper. You usually get 6 to a page and they are just the right size. These can then be cut and stuck to your bottles. Adobe Spark Post is another piece of software that I have used and is available free on IOS. This software is not designed specifically for label generation but has lots of useful features, the labels on the left were designed using this software.
One additional point to consider is what type of printer you have at home. Laser printers produce the best labels as the ink does not run if it gets wet . Inkjet printed labels can run a little if they get wet from condensation in the fridge but this is not a big issue.
The picture shows the finished article, using plain A4 paper. The labels were designed with Adobe Spark post and printed with a colour laser printer.
Contacts
Visit us on Facebook or Email