
Brewing Equipment
What Equipment?
The best part about home brewing is that you do not need a lot of equipment to make a reasonable brew. Yes, you can spend over £1,000 on a conical fermenter but you can also get similar results from a £15 bucket. To get started there is relatively few items of equipment that you will need to acquire and some of this you can make yourself. Part of the fun with home brewing is making your own equipment and can lead to a constant chain of upgrades if you are not careful. Some equipment will not make your beer any better but will make the process easier and shorten your brew days. Below you can see all the equipment that I have been using.
Equipment Contents:









Mashing Equipment
If you look at the homebrew sites you will see plenty of insulated mash tun's for sale. These are basically cool boxes, which have been conversed for the homebrew market but can seem a little expensive when you are starting out. A cheap alternative is the "bucket in bucket" approach, which is cheap and works well, mine only cost me around £10.
Bucket in Bucket
This is what I did for my first Mash Tun:
- Take 1 old fermenting bucket.
- Drill hundreds of 3mm holes in the bottom.
- Put bucket with the holes drilled, inside a standard fermenting bucket with a tap.
- Purchase a hot water cylinder insulation jacket from your local DIY store and wrap the whole thing up.
You now have an insulated mash tun, which will hold its temperature for well over the normal 1.5 hours required. The cost of £10 was for the cylinder insulation jacket, as I already had the other bits hanging around.
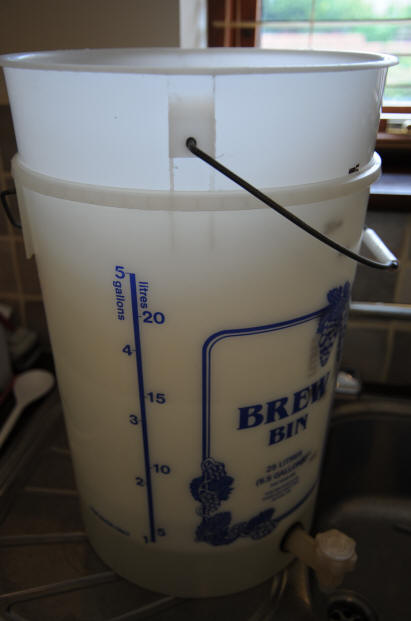
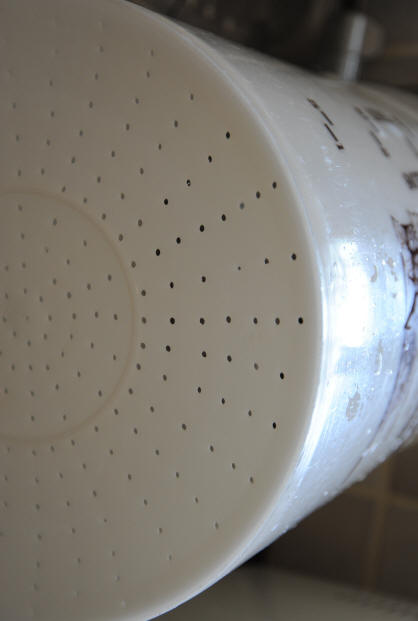
Here we can see my old brew bin with lots of holes drilled in the bottom. This then inserts into a second brew bin, which creates a false bottom. Once the insulation is added, we have the prefect home made Mash Tun.
I have also used this same set-up as a Hop Back. ON a previous brew my boiler became clogged with Hops and would not drain the Wort. In this case I bailed all the hot Wort out of the boiler into my Mash Tun, which worked perfectly in filtering out the spent Hops.
For this Brew I have made a hop filter, which fits into my Boiler, so it should be easier to filter out the spent hops. More on that below.

This picture shows what the mash Tun looks like once it has been fully insulated. This may not look very pretty but it is remarkably effective.
Once I have a stable temperature in the Mash Tun it will hold within 0.2 of a degree centigrade over the 1 hour 30 minute normal Mash time.
I use a digital thermometer to measure the temperature so that I can insert the probe at the beginning and only open the Mast Tun lid if the temperature requires some adjustment.
Cooler Based Mash Tuns
If you can afford to purchase a cooler as a mash tun then this is a good upgrade from the bucket in bucket approach. The picture below shows a 54L Igloo coolbox that I am using for a Mash Tun.

If you buy a cool box, make sure that you get one with a drain already fitted. The Igloo brand mainly have drains pre-fitted with a 1/2" hole , which is perfect. As these boxes already have a drain fitted it is a simple case of swapping this for a lever valve.
A 1/2" Stainless Steel lever valve has been fitted for draining wort. Some kind of manifold / strainer is also required to separate the wort from the grain.
This coolbox will easily hold the temperature required for 1 hour 30 Minutes.
Purpose Built Mash Tuns

The 20 Gallon SS Infussion Mash Tun is my latest addition and is a purpose built vessel. The SS Brewtech equipment is very expensive and as such is aimed at the serious home brewers. The built quality and functionality are second to none and this an excellent addition to my brewery. However, this will not necessarily make better beer as I have had many excellent brews from my cheap DIY Mash Tuns.
If you can justify spending the money on your hobby then this is a nice piece of equipment. The Tun includes a Manometer, sloped bottom with bottom drain, purpose built false bottom, recirculation port and is fully insulated.
Sparging Equipment
There are a few different ways of Sparging but the most impressive and efficient way is to use a rotating sparge arm. I bought a "Phils Sparger" some years ago, so not sure if they are still available. There are posts on some of the forums about making one of these devices but the most difficult part seems to getting the holes drilled fine enough on the rotating arm. The holes need to be almost pin pricks to work properly.
The picture below shows the sparge arm in action. This works like a dream and also looks impressive for showing your mates.

Note: fly sparging is not essential and the alternative of batch sparging is a much easier process, requiring less equipment (nothing additional). Even with my purpose built mash tun I prefer to batch sparge as it is just easier and does not require any attention. Some brewers are even performing a no sparge mash, which is even easier. Check out the Mashing and Sparging page for more details.
Boiling Equipment
Plastic 23L boilers
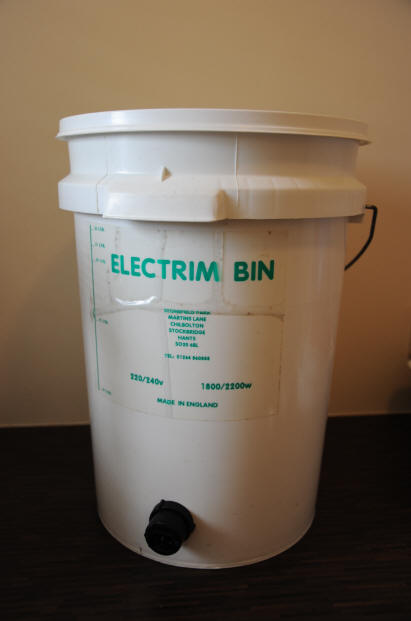
I have an Electrim boiler, which seems to do the job well and has given me many years of service.
I have done a couple of minor modifications to this boiler as follows:
1. I have removed the original Tap, which had quite a small bore and replaced this with a standard Barrel Tap (3/4").
2. The boiler originally had a thermostat. These are about as much use as an ashtray on a motorbike, so it was removed.
As this has a standard 3/4" thread it also enables me to fit a standard copper plumbers tap connector to the inside of the tap. This is then used to connect to my homemade hop strainer. See below.
I have now invested in a stainless steel pot (see below) for boiling but the Electrim will still get used to heat Mash Liquor and Sparge Water.
Stainless Steel Stock Pot
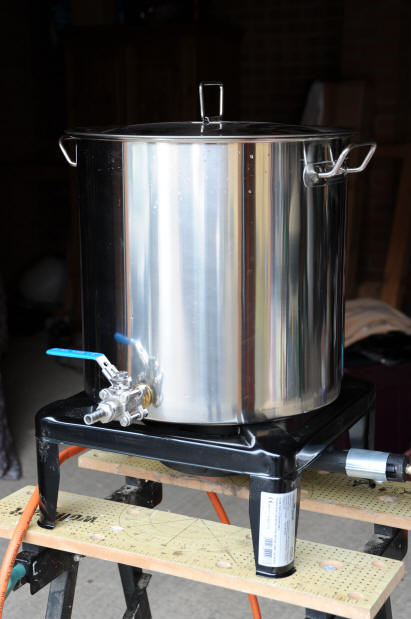
The stainless steel stock pot seen here has had a lever valve fitted but otherwise is standard. Part of the reason for moving to this pot was the size, as these are available up to 100L. The pot here is a 50L pot, which is just big enough to do a 40L batch and fill 2 Cornies. I have not fitted an electric kettle element to this pot for a number of reasons as follows:
1. Curvature of stainless steel makes getting a good seal a pain.
2. The Gas boiling ring is 8Kw so generates a lot more heat.
3. Gas is easier to control.
4. Already have gas for the BBQ.
Note that there are some disadvantage, the main one being that 40L is already too heavy to move around. I solved this by using 2 of my older buckets to move in 2 batches.
Cooling Equipment

After the boil we have to cool the wort to the correct yeast pitching temperature. Some people sit the hot wort in a bath of cold water but this takes hours. The best way is to invest in a wort chiller. The wort can be chilled from boiling point to pitching temperature in around 30 minutes with one of these.
These work out around £40 from Leyland Homebrew, see links page.
Before I purchase mine I investigated the DIY approach as 10mm copper tube is quite easy to bend. The problem was that by the time you have purchased the raw materials the cost is similar to buying one. I thought, why waste my time, let someone else make it. So I purchased one instead.
Hop Strainer

This is my home made hop strainer. As you can see this is just a few bits of 22mm copper pipe and fittings which have been soldiered to a 3/4 tap connector. This cost under a tenner to make. The tap connector fits directly onto the back of my boiler tap, shown in the picture.
I have drilled plenty of 2 mm holes into the pipe which sits on the bottom of the boiler. The trick here is to ensure that you can get as much of the precious Wort as possible out of the boiler after the boil. You will notice that I have also added some large siphon tubing to spout of the tap. This creates a siphon effect as the beer is draining from the boiler and effectively sucks the Wort out of the bottom.
I have not used this as yet so I will update this page after the first Brew. I have tested it with water and the hop strainer seems to suck all but the last half pint out of the bucket. Hopefully it will do the same with the Wort and hops in the boiler.
Update: Works a treat, did not get blocked and filtered all but the smallest particles.
Temperature Controller
Controlling the fermentation temperature of the Wort is essential in creating quality beer. For years I struggled with a heating pad, a thermometer and some manual switching on/off. Fortunately I have a life and therefore continually forgot to check the temperature. The result was beer fermenting either too hot or too cold, neither of which is any good. After some Forum investigation I found that Brewers in hot countries were using temperature controllers to regulate old fridges to control fermentation temperature. Living in the UK we do not normally have to worry about the heat as we usually get about 1 day a year of summer (bloody weather). However, we do frequently have to apply heat to raise the fermentation to the correct temperature. Therefore, project STC1000
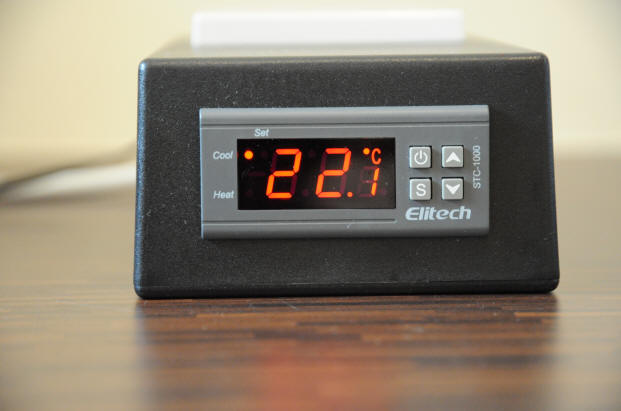
This is the STC1000 Temperature controller, which I bought on ebay for around £15, delivered from Hong Kong. The STC1000 is only the grey part and has to be fitted into a suitable surround / box. Without the black enclosure you will have bare wires with 240v running through them. Bearing in mind that you are going to use this bit of kit near water (or beer to be precise), you need to remember that electrocution and death is not a great hobby. The wiring diagram is quite straightforward for most people who are confident at DIY but if in doubt, do not do this on your own.
I think that these controllers were originally designed to control the temperature of Aquariums. They have a 10Amp rating so be careful not to overload them. I am only using this unit to control a heat pad which is nowhere near 10 Amps so this is not an issue for me.
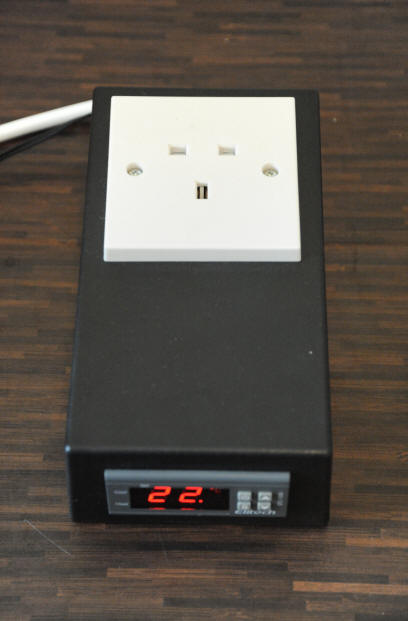
In this picture you can see the size of the box and get an idea of how it was made. The following components are required:
1. STC 1000 - from ebay
2. Suitable enclosure - from Maplin
3. 13A standard electrical socket
4. Plastic surface mount pattress box 32mm
I cut a hole in the front of the box for the STC1000 to be inserted into and a hole in the top of the box for the 13Amp Socket to be fitted to. The pattress box was hot glued to the inside of the black box in order for there to be something for the 13Amp socket to be screwed into. I also drilled a couple of holes in the back for the power cable and the sensor cable. The result is a professional looking piece of kit that works a treat.
Note: The socket on my controller is only wired to the heating control switch on the STC 1000. If you want to use the cooling control switch as well, then a bigger enclosure box and a double 13Amp socket will be required.

This picture shows the NTC temperature sensor that the STC1000 is shipped with. This is completely sealed and can therefore be submerged in liquid (Wort in this case). This give extremely accurate temperature readings to points of a degree. You can set the temperature tolerance on the controller as desired. I have mine set to 0.5 of a degree which means that if I set the controlled temperature to 20 degrees the power to my socket is switched on when the SCT1000 reads 19.5 degrees and off again at 20 degrees.
The best part about using this controller is that I can set the temperature and then forget about the fermenting beer for 10 days. More time can then be dedicated to motorbikes or drinking beer.
I have read some forum post that suggest submerging the temperature probe into the beer is just another point to introduce infection. I have found that as long as you are careful and sterilise properly, this is not an issue. As an alternative, I have tried measuring the temperature by sticking the probe to the outside of the fermenting vessel but this did not give accurate readings, so I would not recommend this. I have submerged the probe for the last few brews without any issues. I have now found a supplier of stainless steel probes so may invest in one of these for my next batch.
The STC 1000 can also be used just an accurate digital thermometer. During the mash process I will use the controller to measure the temperature of my mash. This means that I can read the temperature from the controller rather than keep opening the lid of the Mash Tun to look at an analogue thermometer. The controller does not control the mash temperature in any way I just use it as a thermometer.
For a more advanced version of a Temperature Controller, see the STC1000 & Maxi Cooler Project page. This project also shows how to connect up a Maxi Shelf Cooler to a Stainless Steel pot, in order to enable cooling during fermentation.
Specific Gravity Tools
Hydrometer
The main tool used for measuring specific gravity is the Hydrometer. These are widely available from most homebrew stores and are fairly cheap. In the main these are easy to use and remain accurate for both Original Gravity (OG) and Final Gravity (FG) readings. They can also be a bit of a pain as bubbles stick to them which can result in inaccurate readings. Most instructions will tell you to spin the hydrometer to remove the bubbles but they seem to come back so quickly it can be difficult to get a reading. Hydrometers are also calibrated at a certain temperature (usually 20c) so you need to make adjustments if your sample is not at the same temperature.
Another Disadvantage with the Hydrometer is that you need a large sample to get a reading. You can either put the Hydrometer directly into the fermenter (ensure it is very well sterilised or you risk infection) OR draw off a sample into another vessel. The only problem with using a separate test vessel is the volume of beer required, which then gets wasted.
Having said all this the Hydrometer is a simple reliable tool, so you should have one handy.
Refractometer
A Refractometer is an alternative instrument for measuring specific Gravity. This precision instrument uses the light refraction properties of sugar in solution to measure a Brix %. The Brix scale can be easily converted to the more familiar SG for OG but this gets much more complex for FG readings. As the alcohol changes the refraction properties of water the OG has to be known as a reference point. There are then some fairly complex formulas that estimate the FG readings. Luckily for us, other people have thought about this and created spreadsheets or included tools with these calculations in their software. Be aware that the FG calculation is only an estimate and their are many factors which cab affect this, a true reading can only be gained with a Hydrometer. However, in most cases an estimate is all we need for FG and we are only checking to see if fermentation has finished, which can be done by checking the reading is constant over 2-3 days. If you read the forum posts on Refractometers and FG you will see that most users find the calculations for FG are fairly accurate.
Advantages:
- Only need a few drops as a sample.
- Give an accurate OG reading
- Automatic Temperature Correction
Disadvantages:
- Need to ensure they are regularly calibrated. This is easy.
- FG can only be estimated. To get a really accurate FG reading a Hydrometer should be used.
- A bit more expensive, £20 on ebay.


Kegs, Gas and Taps
OK, here's the bad news, this stuff does not come cheap but after years of frustration with plastic barrels, I have finally found Keg heaven. The plastic barrels are OK but they do have their limitations. Some home brewers will tell you that you only need a Corny Keg if you intend to make Lager. For real ale style beers they will tell you the plastic kegs are better. The word "better" seems to mean your beer is completely flat most of the time. I guess this is OK for Ales but in my experience, even a real ale can taste stale from a plastic barrel.
So before you waste any more money on plastic Kegs take a look at the the cornelius set-up below. These Kegs are fantastic and never seem to loose pressure. They will withstand pressure of up to 120psi although god knows why you would want to pressurise to this level. Normal working pressure would be around 30psi for a reasonable level of carbonation.
See the Kegging/Carbonating page for more details on carbonating.
One key difference between the plastic barrels and the Corny Keg is that the beer has to be clear before kegging. There is more detail about this on the Kegging/Carbonating page.
There are two types of Corny Kegs, Ball lock and Pin lock. It seems that the Ball lock Kegs are more popular and these are the ones that I have. The only real difference is the type of quick disconnects that they use.
Here are some advantages of using a Corny Keg:
- Stainless steel, so they are durable and easy to clean.
- No leaks, they hold their pressure.
- Much slimmer than a standard plastic barrel. They will fit in a fridge, if you have one available.
- Kegged with clear beer so can be moved around without making your beer go cloudy again.
- Can be pressured to a higher level allowing forced carbonation
- Quick disconnects allow Kegs to be swapped out easily when empty.
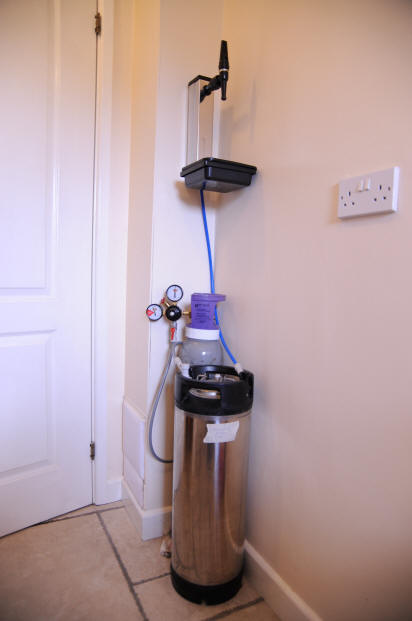
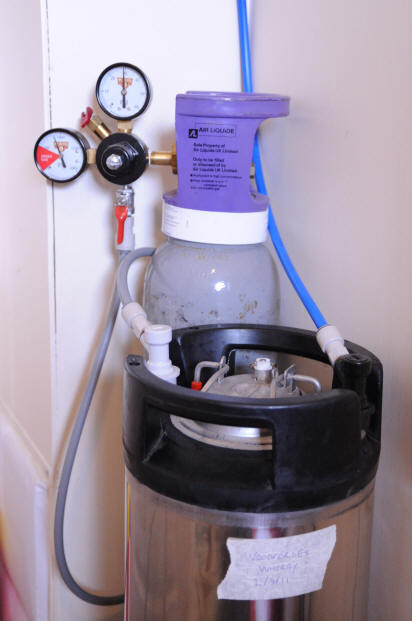
Above, we can see a complete dispensing set-up, which consist of:
- Cornelius Keg
- CO2 Gas cylinder 14Kg Pub Style
- Bar / Pub Tap with flow control
As these items are all relatively slim, I have hidden the whole set-up behind the utility room door. This is a real wife pleaser as the plastic barrels are quite wide and ugly, whereas these are slim and shiny.
Regulators
The great thing about regulators is that you set them to your desired pressure and forget about them. As you draw the beer out of the Keg the regulator automatically refills the Keg with Co2, to the set pressure. This means no more guessing and faffing about with random squirts of gas.
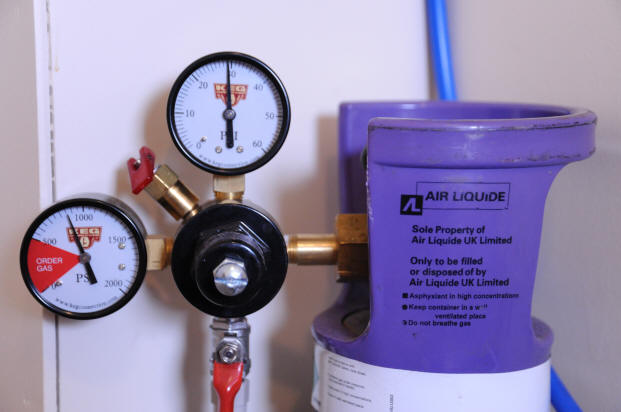
There are many types of regulator on the market and it is important that you investigate this in order to purchase the correct one. Obviously the first thing to check is that the regulator is specifically designed for CO2. This is important as it will not work correctly if you get the wrong type, also Co2 bottles usually have a male connector, unlike other types of gas. A lot of people use regulators designed for welding, some of these are OK but be careful as not all of them have a Psi pressure gauge. Some of the welding regulators will have a flow meter in place of the psi gauge, which is no good for drinks dispensing. If you can get a welding co2 regulator on the cheap, it is possible to swap the flow meter for a psi one but this means a bit of messing about.
The best way to ensure that you get the correct regulator is to purchase one specifically designed for drinks dispensing. These are designed to work in the correct pressure range and have a Psi guage, of the low pressure type.
This enables precise pressure adjustment in 1 psi steps, which is critical. Remember that for brewing you will only use the 0-30 psi range, so the guage must be accurate in this range.
Pressure release valves are also usually provided on these regulators, which will enable you to release pressure in the gas line.
This is important if you need to reduce the pressure in your Keg. For brewing it is essential that you have a one way valve, either built into the regulator (the brewing ones have these) or on the gas line.
If you connect your gas line with the pressure set to 10psi and the pressure in the Keg is 30psi, there is a risk that beer could be forced back into the regulator.
If this occurs, your expensive regulator will die. See the Kegging/Carbonating for more information on how to handle this situation.
Visit the Brewing Links page for a source of regulators, which can cost from £40-£100. You can get regulators that will service 1, 2 or even 3 Kegs at once, with the ability to set a different pressure in each Keg. This is not really necessary as you will probably only use one Keg at a time and you can always just swap the Gas between Kegs as they have quick disconnects. If you want to have 3 Kegs available on 3 different taps for a home bar, you can still do this with 1 regulator as long as all Kegs need the same pressure. For this you just use John Guest splitters on the gas line.
Gas
Finding a gas supplier can be a bit of a pain. The home brew market does sell gas but this is expensive and comes in small bottles. Some Aquatic suppliers will fill CO2 bottles but they have to be certified every few years or they will not touch them. Another issue is that the co2 provided by the aquatic shops is not food grade approved. I would have thought that CO2 is CO2 but there may be some contaminants, so avoid if possible. If you have a local welding supplier or Fire Extinguisher servicing company, these may also fill C02 bottles for you but again they will not be food grade.
The safest, and in some cases, the cheapest approach is to find a drinks dispensing gas provider. You can use BOC who are everywhere but you will have to pay a rental on the cylinder, which can work out expensive. BOC does have competitors and most of these do not require rental but they will probably want a deposit on the bottle. I used a company called AIR LIQUIDE who provide gas specifically for drinks dispensing. At least you can rest assured that this gas will be safe to use. The cost depends on how many bottles you need but as they are 6.35Kg (14lb), assume you only need 1 to start with. The cost is, £40 deposit plus a £19 filling charge, which includes free delivery. For refills you just pay the filling charge and these bottles seem to last forever, so it works out cheap in the long run. If you take more than 1 bottle the deposit can be negotiated, with some distributors waiving the deposit if you take multiple bottles. My 6.35Kg bottle has lasted 2 years and I have been using quite a lot of gas for flushing the kegs when cleaning.
For a list of Air Liquide distributors click here
Corny Keg Shopping list, what you will need
- A Corny Keg (best get 2)
- Quick Disconnects x2 (inlet & Outlet)
- Some john Guest fittings to convert quick disconnects to standard 3/8 beer line
- Beer Line 3/8
- CO2 Regulator
- CO2 Gas bottle
- A tap - best to buy a second had bar tap with flow adjustment
Flash Coolers
In the winter, keeping beer at room temperature (14c) is not that much of a challenge, there is usually one part of a house that is cool enough to store / serve beer. However, in the summer months this is not so easy and your beer will be warm, which is very unpleasant. On a steaming hot summers day, there is nothing quite like a chilled beer.
Even if you are an ale drinker, you will appreciate that trying to drink beer at 25c is far worse than chilling the beer to 10c. I spent quite some time looking at coolers but the commonly available ones are designed for under counter use in pubs. These are very ugly, have a huge footprint and take over 45 minutes to get to the correct temperature. This makes them unsuitable for home use in my opinion.
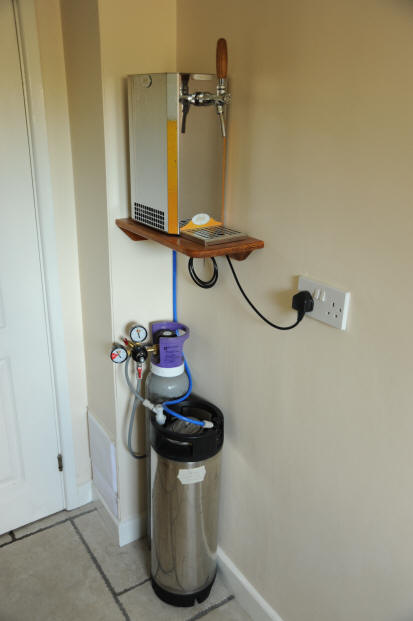
After searching the internet I stumbled upon an alternative. A company called Lindr make counter top flash coolers, which are designed for small cafe bars or events. Warning - These are not cheap but they have the following benefits:
- Made of Stainless steel and look great.
- Have a small footprint, so can easily fit on a counter top.
- From switch on, the beer is ready in 3-4 minutes
- Temperature can be adjusted from 4 - 10c.
- The tap is a good quality one.
- Chilling the beer gets rid of all the foaming issues you get with warm beer.
The downside is that the beer is chilled to 10c, which is a little on the cool side for real ale but this is preferable to 20c+ in summer. I tend to drink in half pint glasses, so although it starts at 10c it soon raises as I am holding/drinking.
Below are some pictures of the Lindr cooler in my new set-up:

Pumps and Fittings
After years of managing my without the use of a pump I finally upgraded my set-up to include one. It is safe to say that a pump is not an essential piece of equipment and even when brewing 40L batches I have managed by moving my wort around in small batches using buckets
Using a pump has the following benefits:
- Makes moving large volumes of wort fairly straightforward.
- There is no need to have a 3 tiered system. All vessels can be on a single level.
- During the mash, you can recirculate the wort if you want to use a HERMS/RIMS
- At the end of the Mash you can re-circulate in order to vorlauf.
- At the end of the boil, you can re-circulate to ensure that the wort is clear and during the cooling phase to reduce heat pockets.
Types of Pump
There are quite a few pumps available on the home brewing market but some are not really up to the job. The factors that you should consider when choosing a pump are:
- Is the pump made of food safe material.
- Can the pump withstand liquids at boiling temperatures.
- Is the pump head independent of the motor, to avoid contamination. Magnetic drive pumps are the best for this and can also be throttled without damaging the motor.
- Does the pump allow for flow control. Mag Pumps with a ball valve are able to achieve this.
- Will the pump be strong enough (have enough head) for your purposes.
The pump that I am using is the Chugger, which is a purpose built brewing pump. These pumps are a bit expensive but they do the job.
Pump Fittings
In addition to the pump itself you will also need to source the following components:
- Hose - must be food safe e.g. platinum cured silicone
- Ball valve - For throttling the pump flow
- Disconnects - There are a few different types of disconnects available. I am using cam-locks.
- A method of switching the pump on/off - I have added a control switch onto my control box

In the picture you can see the pump transferring the wort from my mash tun into the boil kettle. You will notice that I have used right angle fittings on the disconnect ends that link to by vessels, which minimises any kinking of the hoses.
The type of pump that I have requires a positive head to prime the pump. This can be acheived quite simply as long as teh pump is below your vessels. The pumps must not be run dry or you can damage them, so the on/off switch needs to be within easy reach.
Contacts
Visit us on Facebook or Email