
Boiling & Cooling
If you are brewing using the Full Mash method then you will also have to boil your wort. This is an important part of the brewing process and will require a 25-30l vessel to enable you to boil a sensible sized brew.
Why Do We Boil?
There are several reason why we have to boil the beer and these can be listed as follows:
- Kill bacteria within the Mashed wort.
- Drive off undesirable substances
- Destroys some unwanted enzymes.
- Extracts bitterness, flavour and aroma from the hops.
- Improves clarity of the finished beer.
How to Boil
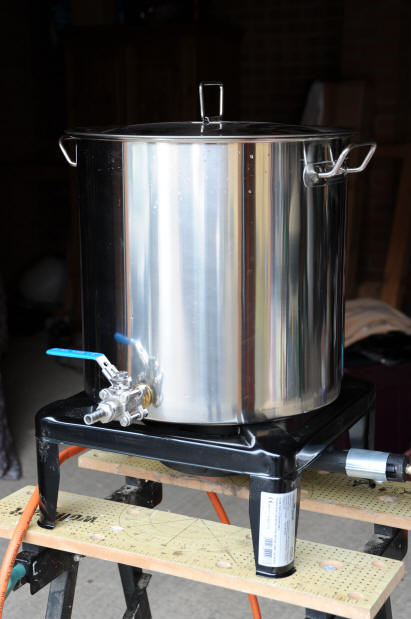
I think that most of you can guess how to boil a liquid, add heat until it bubbles and steams but the practicalities of trying to boil 5 gallons of liquid is more of an issue.
If you have a large stock pot you can use an outdoor gas burner to heat the wort. However, most people find that using kettle elements is more practical and works well. I have an electrim plastic boiler with a kettle element that seems to work well (once the thermostat was removed), see equipment page.
There are also purpose built stainless steel boilers on the market but these are very expensive. Another alternative is a stainless steel stock pot, which works out a bit cheaper.
Where To Boil
The first practical point that you should consider is where you should boil. WARNING! Do NOT do this in the house, unless you are a single bachelor with no hope of a girlfriend. During the boil there is a high level of evaporation as you will create a lot of steam, which means your entire house will be covered in sticky wort. This is your choice of course.
The best place is outside in the garage or under the porch but outside. Mashing is probably best done inside where it is a bit warmer and as you run off /sparge you should start to collect the contents in your boiler and switch it on as soon as the element is covered. Before the wort really starts to boil you need to move it outside. Once a full rolling boil is in progress you should not try and move the boiler as this could prove very dangerous.
During the Boil
What you want to achieve is a fairly vigorous rolling boil. You will find that you get a fair amount of evaporation but this cannot be avoided. Do not be tempted to cover your boiler to minimise evaporation or you will also retain some of the elements we are trying to boil off. I have read that covering the boiler is not as much of an issue with English malts, so I am sure that partially covering the boiler is not an issue.
If you experience a lot of foaming and a possible overflow, then try stirring the foam back into the wort. You can try reducing the heat but we do not want reduce the vigour of the boil too much.
How Long To Boil
The length of the boil is usually stipulated in the recipe but if it is not then assume 1 hour 30 minutes as this is the most common time used. The boil can be from 1 to 2 hours but it is unusual to be any longer. In most cases the standard 1 hour 30 minutes will work fine, any longer and you will loose too much through evaporation.
The boil should be timed from the point that the rolling boil starts, not the time you switch on your boiler. It can take half an hour to get to the boiling point so this time will need to be added to the 1 Hour 30 Minutes.
Ingredients Added to the Boil & When
There are quite a few ingredients that can be added during the boiling stage. This is basically any ingredient that does not require mashing but this is usually just sugars and hops. All types of sugars can be added at any point during the boil but it is common to add these at the beginning. In complete contrast, it is much more critical at which point the hops are added.
Hops
Hops are used for 3 different purposes:
- As a preservative
- To provide the bitter flavour
- For hop Flavour/Aroma
Hops that will provide the bitter flavour are usually added right at the start of the boil. This allows the boiling process to extract all the bitterness to give our beer that distinct flavour. The problem is that the subtle flavours and aroma are removed by an extended boil. In order to restore these qualities we usually add a second batch of hops around 15 before the end of the boil. This is enough time to extract the flavours and aroma without spoiling them.
Some recipes will also instruct hops to be added at the end of the boil. In this case we can just add them as we switch the boiler off and let it stand for 10 minutes or so.
In addition to hops and Sugar we also add a fining agent for the last 10 minutes of the boil. This is either "Irish Moss" or Protoflac and aids the clearing of the final beer.
First Wort Hopping
Another approach that is used commercially is called "First Wort Hopping" (FWH). This process is said to produce a smoother hop flavour by taming some of the harsher bitterness on the palate and creating a stronger hop aroma. The process is fairly simple, all you do is move a proportion of the hop schedule forward and add them to the boiler, pre-boil, while the sparge process takes place. This lets the hops soak at 60-70C , which extracts more complex flavours.
What is strange about FWH is that you move the Aroma hops forward. This goes against traditional hopping methods as Aroma hops are usually added late to retain the subtle flavours and aroma's, which can be reduced by prolonged boiling. There are many ways that you can implement FWH, so it is best to experiment but as a starting guide some literature recommends only moving a max of 30% aroma hops forward. Another point to note is that the bitterness (IBU) is increased by around 10% for the first wort hops, so some recipe adjustments are needed to take account of this.
Most of the literature that I have found on FWH seems to concur that 30% of the aroma hops should be brought forward but some brewers seem to be adding all of the hops as FWH, with good results.
Hot Break
During the boil Proteins come out of solution and start to coagulate. The extended boil, ensures that they stay out of solution and are less likely to be absorbed back into the wort. A short boil would mean that these proteins go back into solution. The point at which they are more permanently removed by boiling is called the "Hot Break"
Cooling / Cold Break
When the boil has finished we need to cool the wort as quickly as possible to the correct yeast pitching temperature. This is partly to avoid infection and partly to ensure that a "Cold Break" can take place. Rapidly cooling the wort encourages proteins and other particles in the beer to drop out of solution. The faster the wort is cooled, more of the unwanted elements will drop out of solution and can therefore be filtered out of the beer. This results in a much cleaner / clearer beer.

In order to rapidly cool the wort you will require some additional equipment.
Here we can see a wort chiller. This is simply a length of 10mm copper tubing that has been wound into a coil. This coil can be put straight into a boiler, usually about 15 minutes before the end of the boil, which ensures proper sterilisation of the cooler.
The cooler is then connected to the mains water supply so that cold water can be run through the coil. This will normally cool the wort in 30-40 minutes but it does depend on the temperature of your mains water. If you are on a water meter you may want to run the waste water onto the garden to at least try and justify the amount of water you are using.
These coolers cost from £40-£60 depending on where you buy them from, mine was purchased from Leyland Homebrew, see links page.
Draining/Removing Hops
Once the cooling process is finished we can start to drain the wort from the boiler. The cooling process should have given all the sediments in the wort enough time to settle on the bottom of the boiler which will help to produce a clear beer. The run off should be done very slowly to avoid bringing too much trub with the boiler. As with Mashing, the first few running's should be returned until they are free from trub.
The wort will contain a lot of trub from the used hops, which we do not want to transfer into our fermenting vessel, so these have to be removed. There are a few different methods of doing this, as follows:
- Hop Filter/Strainer fitted to inside of boiler tap.
- False Bottom in your boiler
- Hopback
I have been using a home made hop filter in my boiler, which seems to work very well. There are more details on this in the equipment page
A Hopback is just a separate vessel for straining the hops. If you are using th ebucket in bucket Mash Tun then this can be used as a Hopback. You will have to bail the wort from your boiler into the hopback and let it settle for 30 minutes or so. The wort should then be slowly drawn out of the hopback into another vessel. The first few litres should be returned to the hopback as they will contain some trub.
Aerating
The process of boiling any liquid will naturally drive out all the oxygen which is normally dissolved into solution. This is a problem for the brewer as Yeast requires oxygen in order to ferment the wort. We therefore need to put the oxygen back in by a process called "aeration". There is specific equipment available to aerate your wort but this is not really necessary. The easiest way is to run the wort fairly rapidly between 2 vessels ensuring that the wort is dropped from a reasonable height. As the wort drops between vessels and foams on impact ing the lower bucket , oxygen is naturally absorbed back into the wort.
I have a standard beer tap on my fermenting vessel, so I just stand this on a table open the tap and let the wort drop into a second vessel. Do this a couple of times and you are good to go.
We are now ready to move on to the fermentation process
Contacts
Visit us on Facebook or Email