
Summer Lightning (Hopback) Brewing Journal
Started 16/09/12
This brew was planned using the Beer Engine software to make a 2 Corny batch. This will be the first brew that I attempt some water treatment, which I am still learning about. Having checked the composition of my water with Anglian water (Very Hard) I will be using CRS to reduce the water hardness. As there is already a lot of calcium in the water I will not add any DLS for this brew as it is not that far off what is required.
I have a new temperature probe and hop filter to try out for this brew
Recipe
Ingredients:
| Recipe | Measure | |
|---|---|---|
| Pale Malt (EBC 4 or less) | 8244g |
 |
| Challenger Hops (start of Boil) | 76g | |
| Goldings Hops (Last 10 Min of Boil) | 24g | |
| Goldings Hops (End of Boil) | 14g | |
| Yeast | S-04 X 2 | |
| Mash Liquor | 21 Litres | |
| Strike Heat | 72C | |
| Mash Temperature | 66C | |
| Mash Time | 1 Hour 30 Minutes | |
| Sparge Temperature | 77C | |
| Mash Efficiency (estimated) | 75% | |
| Boil Time | 1 Hour 30 Minutes | |
| Batch Volume | 38 Litres | |
| Fermentation Temperature | 20C | |
| Expected OG | 1049 | |
| Actual OG | 1051 | |
| Expected FG | 1012 | |
| Actual FG | 1012 |
Water Treatment:
| Recipe | Measure |
|---|---|
| CaCo3 Adjustments | |
| Calcium Carbonate (CAC03) Anglian | 333 ppm |
| Calcium Carbonate Required | 50 ppm |
| Adjustment Necessary | 283 ppm |
| CRS per Litre Required (Brupacks) | 1.5 ml/L |
| Total CRS to add to Mash (21L) | 30 ml |
| Total CRS to add to Sparge- Can Only got 28L in HLT | 40 ml |
| Chlorine Treatment | |
| Campden Tablets (half in mash, half in sparge) |
1 tablet |
| Calcium Adjustment (using brupaks calculation) | |
| Calcium in Water | 133.2 ppm |
| Calcium Required | 180 ppm |
| Adjustment | 53 ppm |
| DLS (using GW Calc it suggests adding none) | None Added |
New Equipment used
- Stainless steel temperature probe.
- Hop Filter.
Mashing:
- While water was being heated, half a crushed campden tablet and 30ml CRS were added to treat the water.
- The Mash water (liquor) was heated to around 78C and transferred into the Mash Tun.
- Temperature dropped to 74C immediately, a little stirring reduced to 73C.
- Mash tun was left for 5 minutes for water to heat the Tun. After 5 minutes the temperature was 72C so doughed in.
- Grain was given a good stir and then the lid shut with temperature probe in place.
- Temperature settled at almost exactly 66C. At this point the lid was sealed properly and the probe removed. The wire on the probe means that the tun lid is not sealed properly so I will not keep this in during the mash.
- Refilled the HLT with sparge water and switched on to ensure sparge water was ready. Temperature was set to 82C, which allows for some cooling as the water runs through the sparge arm.
- Sparge water was also treated with half a campden tablet and 40 ml of CRS.
- After about 35 minutes the temperature was 66C exactly so I will now leave the Tun closed for the rest of the mash time.
- After the Full Mash Time the temperature had dropped to 65C. This is slightly lower than my target 66C but as this was dropping slowly over time it is perfect.
Sparging
- Sparging should be done at around 77c but by the time that the sparge water hits the grain it will have lost some temperature. I am aiming to keep the sparge water at 82C to take account of this.
- I will be using the fly mashing method using my "Phils Rotating Sparger"
- Sparge water was heated to 82C in HLT using temperature controller to maintain the temperature at 82C.
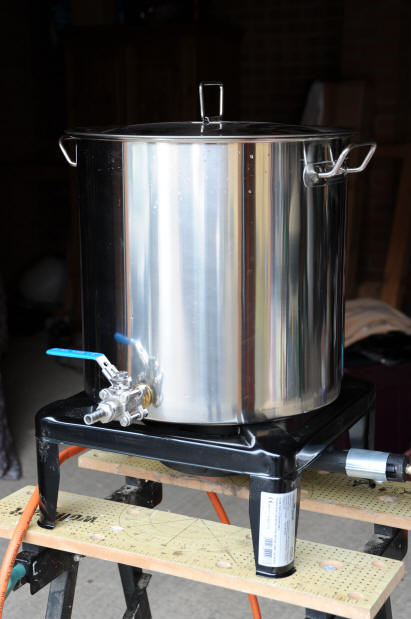
- I am using a 3 tier set-up with sparge water at the top, then mash tun, then boiler at the bottom.
- The Wort will be collected in batches as the full 40L is too heavy to move.
- These batches will be transported into the garage where my boiler is waiting.
- The first 2 litres of run off were returned to the mash tun as they contained trub.
- After collection about 2 gallons, the wort was taken out to the boiler and the gas ring turned on to full.
- In total I have about 8 Gallons to move so this was done in about 4 loads of 2 gallons which worked well.
- Run off into the collection bins was balanced with sparge water being added for about 2/3 of the brew length.
- I then slowed down the sparge and let the mash tun empty. I have been measuring the temperature of the grain in the mash tun during sparging and it seems very low, despite the HLT being maintained at 82C. I think I will need to increase the HLT temperature to get a more efficient sparge.
- I ran out of sparge water before I had collected my final volume. The HLT ran dry and the element came on, which could have been a disaster but I caught it in time.
- To make up the volume I boiled a few kettles and gently poured them into the Mash Tun. I think 3 kettles got me to the volume I wanted.
- Measuring SG the final runnings were still around the 1015 mark, which is Ok but shows that not all the sugars were removed during sparging.
- Sparging took just over an hour in total.
Boiling
- Took about 30 minutes to come to the boil once moved to the garage. I fitted the lid as this seems to speed this process up.
- Once boiling started the lid was removed and the first batch of hops added.
- Timer set for 1 hour 30 minutes.
- Using the gas gives much more control and allows me to set the rolling boil without overcooking it.
- Nearing the last 15 minutes, so I have put the Wort chiller into the boiling wort. This ensures that it is fully sterlilised.
- The second batch of hops was added for last 10 minutes together with the profofloc tablet.
- 1 Minute left so added final batch of hops.
- After the full 1 hour 30 minutes the boiler was switched off and started cooler.
- Measured SG and got a reading of 12.7 Brix 1051. This is just slightly above the expected value so is perfect.
- My efficiency was down a little on this brew from the last one. This may be due to using Crisp brand malts, rather than Thomas Fawcett but I have still managed over 75% (est close to 80%) so cannot complain. My last beer was a little too strong so hopefully this one will be spot on.
Cooling
- Connected up the garden hose pipe to the wort chiller and started the cooling process.
- After about 40 minutes the wort was below 30c but the bottom 2 gallons of wort felt cold.
- It appears that the copper cooler sits too low in my boiler. To rectify this I have used a piece of wood to raise the copper coils so that they sit at the surface of the wort.
- The cold break was now visible and the wort looked crystal clear with clumps of trub forming.
- A further 15 minutes and it was around 24C and did not look like going any cooler. Mains temperature is not that cold at the moment.
Draining/Aeration:
- The cooled Wort was Slowly drained into another bucket. Even the first litre drained was clear but had a few bits of grain husk so was tipped back into the boiler.
- Once it started to pour without any bits, it was left to drain slowly.
- This is the clearest beer that I have ever made, the wort is golden and crystal clear.
- In order to be able to move 40L of wort I used 2 wine fermenters to collect the run off. These are then only 20L each and can easily be moved back inside the house.
- The new hop filter worked a dream proving that holes really are better than slots for filtering hops.
- I had about 2 feet of tube attached to the boiler tap which creates a siphon effect to ensure all wort can be extracted.
- The flow rate was excellent and filtered well right down to the bottom of the pot.
- There was very little wastage, mainly wet hops and a little murky wort (300ml maybe).
- During the draining, the wort also got a good aeration.
- The 50L boiling pot was then cleaned and re-sterilised ready for use as a fermenter. This was set up on a heat pad with the temperature controller managing the heating. I have put the probe straight into the pot as this is now my new stainless steel 200mm version.
- The two wine fermenters were then emptied into the 50L stainless steel pot giving a good aeration.
Fermentation:
- The wort was around the 24C mark, so safe for yeast pitching.
- I did not make a yeast starter as I have had trouble with these in the past, so just sprinkled the yeast on top of the wort as suggested on the packet.
- I left the yeast on top of the wort for around 30 minutes to re-hydrate and then stirred in.
- 17:30 16th June - Yeast stirred into Wort at 24C.
- 08:00 17th June - Fermenting well, 3 inches of Krausen has already formed. The temperature is still too high (24c), even though it was cool overnight. I have now wrapped a wet towel around the fermenter to try and cool it.

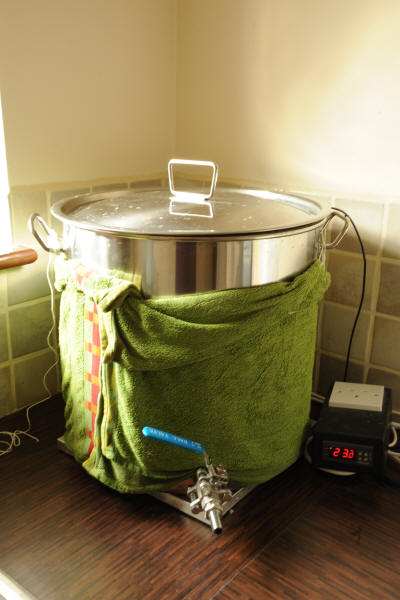
- 17:00 17th June - Temperature is now down to 23c which is better but still a little higher than I would like. The Krausen has already started to subside a little.
- 21:00 17th June - Temperature is now below 22c, which is perfect. The Krausen has subsided quite a lot now.
- 08:00 18th June - Temperature is now at 20c, the heater tray is now able to keep the temperature stable. Fermentation has slowed down now and there is little Krausen left.
- 17:00 18th June - Specific Gravity was checked - The Refractometer shows 7.7 Brix, which converts to 1019 using the morebeer calculation. This means that SG has dropped 32 points in 48 hours.
- 20th June - All Krausen has dropped into beer, there are just a few bubbles on the surface now. Taken a SG reading and it is around 7.1 Brix. This is estimated at around an SG of 1014, which is only 2 points off final gravity.
- 21st June - Brix reading has not really moved. It is now closer to 7.0 so I will transfer to the wine fermenters under airlock for the final week.
- 25th June - Still bubbling slowly. 29th June - Still bubbling slowly. I have not taken another SG reading as I do not really want to expose the beer to the air. It is safe in the fermenter so I will leave alone for at least 2 more days.
- 2nd October - SG reading is 6.8 Brix which equates to around 1012. This is now the final gravity reading and is in line with what was expected.
Clearing:
- 2nd October - Poured about 1 pint of boiled water into a jug and added gelatin. This was stirred well, then poured into beer and gently stirred in.
- 6th October - Beer looked almost completely clear. Ready for kegging. There were some clumps of gelatin floating on the surface which did not look too pleasant but these will be lost when the beer is transferred to the Keg. I am not sure if I will bother with Galatin for my next brew.
Kegging:
- 6th October - " Corny Kegs were cleaned with Oxyclean, rinsed then sterilised with IO Star. This is a non rinse steriliser but I do not like the idea of leaving iodine in my beer so Kegs were rinsed with boiling water from the kitchen kettle.
- Beer was transferred into each Corny via siphon tubing and filled them both perfectly.
- The siphon tube was kept submerged to avoid introducing any air.
- Rubbers seals on lids were smeared with a fine layer of Vaseline and then sealed.
- Kegs were pressured to around 30 Psi and were purged 4 times with 10 minutes rest between each purge.
- Kegs will be carbonated by natural absorption, so this will take a few days.
- 10th October - Wednesday - Kegs are still taking a small amount of gas when I switched the gas feed between them today. This should be complete tomorrow.
Tasting Notes:
- Prior to Kegging a sample was poured into a glass. The beer is not crystal clear but very close already.
- There is a good malty taste and the hop flavours are not too astringent. I am hoping that the water treatment has tamed the strong bitter taste that I was getting with my beers.
- I will probably start drinking the first Keg after 1 weeks conditioning, so will add an update at this point.
- 1 week in Keg - Beer is now well carbonated. I have poured a couple of halves from the Keg and the beer is very smooth with a nice hop taste. It is not completely bright and clear but it is early yet.
- The beer will need a couple more weeks to condition properly. It is already very drinkable so can only get better.
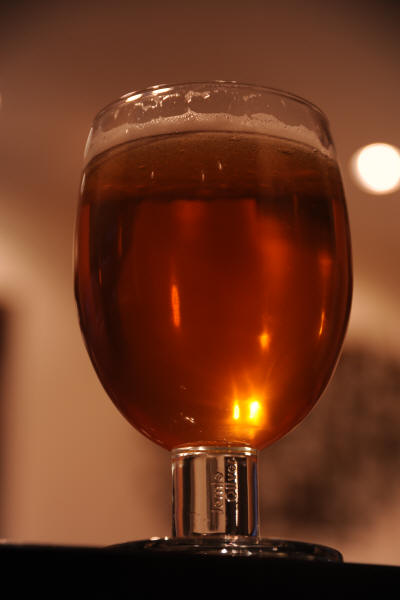
- The beer has now been in the keg for 2 weeks and is crystal clear. The picture below makes the beer look slightly darker than it actually is but I think you can see how pure and clear this brew now is.
- There is a pleasant mouth feel, not too thick , and the beer is very light and easily drinkable. A soft malty taste that is not overpowering delights the taste buds. The hop character of this particular brew is very pleasing and whilst providing good bittering is not harsh.
- Great Beer! A1
Final Notes On Water Treatment
This was the first ever brew that I have attempted water treatment. It is difficult to say how much impact this has had as there are so many factors to consider when all grain brewing. However, this is a great beer and the one area that there has been significantly improvement was that the beer did not have a harsh bitter taste.
If I was served this beer in a pub, I would definitely be going back for more, so I guess this means that the water treatment was a success and is worth doing. I will continue with the same treatment on my next few brews to see if this gives consistent results.
New Equipment
Hop Filter- was well worth the effort as this worked extremely well. This proves that holes work much better than slits in the boiler. The New filter is longer as my 50l pot is quite wide and contains holes on the bottom only to minimise loss of wort. This filter is also connected via a compression fitting rather than a tap connector, which means that I am not hunting for lost washers. One thing that I need to take care of is that I tightened it a bit too much and when it was removed the tap came loose from the boiler before the compression fitting released.
Probe - did its job well, not much more to say about it than that. It will make sterilising easier in future.
Contacts
Visit us on Facebook or Email