
London Pride 38L Brewing Journal
Started 21/10/12
This brew was planned using the Beer Engine software to make a 2 Corny batch. London Pride is one of my favourite beers and this recipe is supposed to be very close to the original. The forums seem to be in agreement that the yeast makes a real difference for this recipe and is what actually recreates the London Pride flavour. In order to get as close as possible to the real thing, you need to use a fullers strain, so I will be using White Labs WLP002.
Recipe
Ingredients:

| Recipe | Measure |
|---|---|
| Brew Length | 38L |
| Pale Malt (EBC 4 or less) | 6195g |
| Crystal Malt | 619g |
| Challenger Hops (Start of Boil) | 11g |
| Northdown Hops (Start of Boil) | 13g |
| Target Hops (Start of Boil) | 19g |
| Goldings Hops (Last 10 Min) | 16g |
| Yeast | WLP002 |
| Mash Liquor | 17 Litres |
| Strike Heat | 72C |
| Mash Temperature | 66C |
| Mash Time | 1 Hour 30 Minutes |
| Sparge Temperature | 77C |
| Mash Efficiency (estimated) | 75% |
| Boil Time | 1 Hour 30 Minutes |
| Fermentation Temperature | 20C |
| Expected OG | 1040 |
| Actual OG | 1043 |
| Expected FG | 1010 |
| Actual FG | 1010 |
Water Treatment:
| Recipe | Measure |
|---|---|
| CaCo3 Adjustments | |
| Calcium Carbonate (CAC03) Anglian | 333 ppm |
| Calcium Carbonate Required | 50 ppm |
| Adjustment Necessary | 283 ppm |
| CRS per Litre Required (Brupacks) | 1.5 ml/L |
| Total CRS to add to Mash (17L) | 25 ml |
| Total CRS to add to Sparge- Can Only got 28L in HLT | 40 ml |
| Chlorine Treatment | |
| Campden Tablets (half in mash, half in sparge) |
1 tablet |
| Calcium Adjustment (using brupaks calculation) | |
| Calcium in Water | 133.2 ppm |
| Calcium Required | 180 ppm |
| Adjustment | 53 ppm |
| DLS (using GW Calc it suggests adding none) | None Added |
New Equipment/Ingredients used
- Liquid Yeast - WLP002 - This is directly pitchable into 20L, so I have 2 vials to pitch. This is very expensive but I plan to harvest the spent yeast and re-use for my next batch.
- Brewing table - Big heavy table built from old bits of wood I had lying around. The Black & Decker workbench was looking a bit tired.
Mashing:
- The night before my brew day I filled my HLT with 17L of water, half a crushed campden tablet and 25ml CRS to treat the water. This was left to stand overnight.
- 08:00 - Switched on HLT to heat Mash water (liquor) to 78C.
- Weighed out grain in a separate bucket.
- Filled Mash tun with warm water to heat it ready for Mash Liquor.
- 09:15 - Transferred water into the Mash Tun and closed lid for 10 minutes for temperature to stabalise.
- After 10 minutes the temperature was 72C so doughed in.
- Grain was given a good stir and then the lid shut with thermometer in place.
- Temperature settled at almost exactly 67C. At this point the lid was sealed properly and some extra insulation added to the mash tun.
- Refilled the HLT with sparge water and switched on to ensure sparge water was ready. Temperature was set to 85C, which allows for some cooling as the water runs through the sparge arm.
- Sparge water was also treated with half a campden tablet and 40 ml of CRS.
- 30 minutes into Mash the temperature was checked again , it has now settled to 66C which is perfect so I will not open Tun again.
- At 1h 30 min the temperature was 65c which is fine.
- Sparge water was about 5 minutes away from the required temperature so I started setting up the sparge arm. By the time I was ready to start the temperature was at the 85c that I had set. This is higher than the recipe as I appear to loose a lot of heat in the sparge arm.
Sparging
- Sparging should be done at around 77c but by the time that the sparge water hits the grain it will have lost some temperature. I am aiming to keep the sparge water at 85C to take account of this.
- I will be using the fly mashing method using my "Phils Rotating Sparger"
- Sparge water was heated to 85C in HLT using temperature controller to maintain the temperature at 85C. I am using a 3 tier set-up with sparge water at the top, then mash tun, then boiler at the bottom.
- The Wort will be collected in batches as the full 40L is too heavy to move. These batches will be transported into the garage where my boiler is waiting. The first 2 litres of run off were returned to the mash tun as they contained trub.
- After collection about 2 gallons the wort was taken out to the boiler and the gas ring turned on to full.
- In total I have about 8 Gallons to move so this was done in about 4 loads of 2 gallons which worked well.
- Run off into the collection bins was balanced with sparge water being added for about 2/3 of the brew length. I then slowed down the sparge and let the mash tun empty.
- As my HLT is not big enough I topped up with about 4 kettles of water during the process.This time I have over sparged and ended up with more wort than required. The final runnings were around 1010 so this is not a problem.
- Sparging took just over an hour in total.
Boiling
- I have drained a few litres out of the boiler as it was just too full. Once the boil has evaporated some of the wort I will add this back. As long as all wort gets an hour in the boil it should be fine.
- Took about 40 minutes to come to the boil once moved to the garage. I fitted the lid as this seems to speed this process up.
- Once boiling started the lid was removed and the first batch of hops added.
- Timer set for 1 hour 30 minutes. Using the gas gives much more control and allows me to set the rolling boil without overcooking it.
- After about 25 minutes the volume in the boiler had already dropped so I started to slowly add the extra wort. This then got at least 1 hour of boiling.
- The hot break was evident so a god boil was acheived.
- Nearing the last 15 minutes, so I have put the Wort chiller into the boiling wort. This ensures that it is fully sterlilised.
- The second batch of hops was added for last 10 minutes together with the protofloc tablet.
- After the full 1 hour 30 minutes the boiler was switched off and started cooler.
- Measured SG and got a reading of 11 Brix 1043. This is just slightly above the expected value so is perfect.
- Efficiency was around 80% which is above expectations.
Cooling
- Connected up the garden hose pipe to the wort chiller and started the cooling process.
- Used some wood to prop up the chiller so it sits at the top of the wort, just below the surface. This makes cooling more efficient.
- Cooling took around 40 minutes.
- The cold break was now visible and the wort looked crystal clear with clumps of trub forming.
Draining/Aeration:
- The first runnings had lots of bits so about 3 litres was returned to the boiler.
- The wort was then running clear, so collection started into a 5 gallon wine fermenter.
- The wort was extremely clear again, almost crystalline. The colour is perfect for London Pride.
- In order to be able to move 40L of wort I used 2 wine fermenters to collect the run off. These are then only 20L each and can easily be moved back inside the house.
- The hop filter did its job well in its second brew batch. There was very little wastage, mainly wet hops and a little murky wort (300ml maybe).
- During the draining, the wort also got a good aeration.
- The 50L boiling pot was then cleaned and re-sterilised ready for use as a fermenter. This was set up on a heat pad with the temperature controller managing the heating. I have put the probe straight into the pot as this is now my new stainless steel 200mm version.
- The two wine fermenters were then emptied into the 50L stainless steel pot giving a good aeration.
- Temperature was 19.8C and ready for yeast pitching.


Fermentation:
- 21/10 17:00 - The liquid yeast vials from White Labs have been out of the fridge all day so should be OK to pitch. These were shaken well then emptied into the wort and stirred in. This yeast is very expensive and @ £6 per vial means that I am going to try and collect / re-pitch into the next batch.
- 21/10 23:00 - No sign of any bubbles yet, temperature is 20C.
- 22/10 06:40 - Still no sign of any bubbles, getting a little worried at its now been nearly 14 hours since pitching.
- 22/10 08:30 - I think I have just seen a couple of bubbles but not much gong on. Raised temperature to 21C
- 22/10 19:00 - Checked when got home and there is now a reasonably thick yeast head, although nothing like I get with S-04. The krausen looks clean, so I am hoping that the yeast can be harvested without too much trub. I have turned the thermostat down to 20C now but the temperature has remained at 21C. I hope that fermentation does not raise temperature any higher as this yeast is noted as not working well above 22C.
- 22/10 23:00 - Temperature still around 21C but central heating is now off so hopefully this will remain around this temperature.
- 23/10 Krausen still well established, some trub is visible on top of the Krausen but very little. The temperature has started to rise and is now at 22.5C. This is a little warm and therefore I have wrapped a wet towel around the fermenter.
- 24/10 08:00 Temperature has now stabilised and is around 21C.
- 24/10 20:00 Temperature is just under 21C. I had noticed that I still had my controller set to 21C so have now lowered this to 20C. The Krausen is now very thin, so fermentation must be slowing down.
- 25/10 Temp now at 20c and slowly fermenting. I will measure SG tomorrow and decide if any rousing is required.
- 26/10 Brix reading was around 5.8 which equates to about SG1012 using the morebeer calc. I will move the beer into 2 wine fermenters under air lock over the weekend.
- 29/10 The beer has had a couple of days for the yeast to clear up the excess diacetyl from the initial fermnation. Brix reading is around 5.7 SG1011, so given the error factor with using Brix, I think it is about done. I have now moved the beer into wine fermenters under airlock to finish/clear and the airlocks are only bubbling very slowly. The beer is already clear but will be better after a few more days.
- The yeast cake on the bottom of the primary has been collected into 4 sterilised bottles, which have been put in the fridge. I am planning to use one of these for a starter on my next brew.
Clearing:
- The beer was nearly clear after 1 week in the primary. I am not planning on using any finings for this beer as the yeast is an extremely flocculent strain.
- 5 days later, the beer is clear and ready for kegging. The WLP002 yeast is an extremely flocculent yeast and clears really well.
Kegging:
- 2 Corny's cleaned and beer kegged.
- Purged corny's 4 times Pressure set to 15 Psi.
- One Corny has a dodgy poppet that is not sealing properly. Wiggling the poppet seems to sort the issue but not good. Written to Norm for a replacement.
- 4 Days at 15 psi and still taking on gas. Both Kegs seem to keep taking on Gas so they are not sealing properly.
- I have used Corny Kegs for a while now and this is the first time that I have had an issue. Both of these Kegs are new ones (recon) from Norm, so I will dismantle when empty and se what is wrong.
- Update - The leaking problems were traced to worn out posts. Both the Kegs had posts which were worn on the inside sealing edge. Norm sent some new posts and now everything works fine.
Tasting Notes:
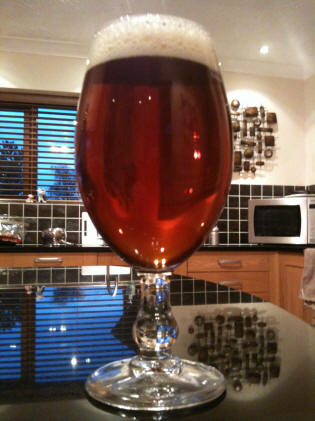
Finally ready to drink! The colour of this beer is near perfect for London Pride. It is very smooth and easy to drink with a subtle bitter taste. The malt flavours are very soft and the WLP002 yeast has left some residual sweetness. Mouth feel is very good and the liquid yeast seems to add a creaminess that I have not had before.
How close is it to the real thing? pretty close actually. I am not sure that it would actually pass for London Pride but it is close enough to enjoy the style. All in all, a very good beer and I think that that it is one to do again. However, time will tell as it is still very young.
Update - This was a great beer that matured well and everyone enjoyed drinking. It did not last long which is always a good sign.
Is the liquid yeast worth the extra cost? This is a difficult question to answer, particularly as S-04 performs so well. I think on balance it is just about worth it.
Contacts
Visit us on Facebook or Email