
Holy Grale
Recipe
| Recipe | Measure | |
|---|---|---|
| Pale Malt (EBC 4 or less) | 8800g |
 |
| Crystal Malt | 400g | |
| Challenger Hops (start of Boil) | 75g | |
| Goldings Hops (Last 10 Min of Boil) | 24g | |
| Goldings Hops (End of Boil) | 14g | |
| Irish Moss (Last 10 Min) | 2 tbsp | |
| Yeast | S-04 | |
| Mash Liquor | 23 Litres | |
| Strike Heat | 72C | |
| Mash Temperature | 66C | |
| Mash Time | 1 Hour 30 Minutes | |
| Sparge Temperature | 77C | |
| Mash Efficiency (estimated) | 75% | |
| Boil Time | 1 Hour 30 Minutes | |
| Batch Volume | 23 Litres | |
| Fermentation Temperature | 20C | |
| Expected OG | 1052 | |
| Actual OG | 1060 | |
| Expected FG | 1013 | |
| Actual FG | 1013 |
New Equipment Used
- Igloo 54L Coolbox with Copper Manifold & Stainless steel Lever valve.
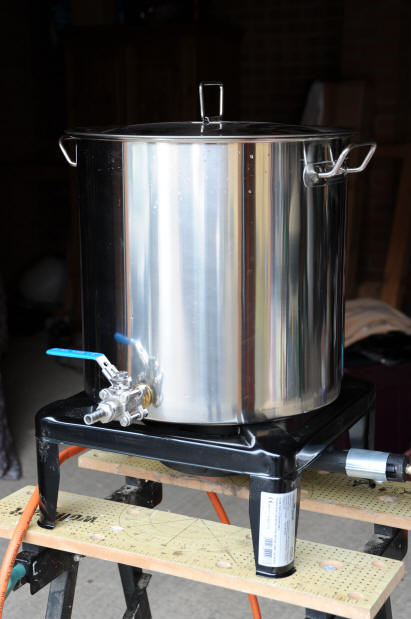
- Stainless steel 50L boiling pot with Stainless steel level valve and hop straining manifold.
- Gas Burner for heating the boil
Cleaning
The following equipment was sterilised using VWP.
- Boiler
- HLT
- Hop Filter
- Mash Tun & Manifold
- Digital Thermometer for Mash Tun
- Glass Thermometer
- Large Spoon
- Collection vessells - 40L is too big to move in one go.
- Sparge Arm
- Sparge tubing
Mashing
- The Mash water (liquor) was heated to around 80C and transferred into the Mash Tun.The Water temperature settled at 74c almost instantly.
- Left alone for another 10 minutes to warm up mash tun then stirred until strike heat was at 72C. Took around 5 minutes.
- Next time can probably get away with 78C for liquor temperature.
- The grain was then added and well stirred to ensure that no dry pockets existed.
- After 5 Minutes the temperature was around 67C, which is higher than the planned 66C but not enough to start messing around.
- Refilled the HLT with sparge water and switched on to ensure sparge water was ready.
- Temperature was set to 80C, which allows for some cooling as the water runs through the sparge arm After about 1 hour the temperature was 66.5C
- Temperature remained stable for the rest of the Mash. New Mash tun/coolbox seems to hold temperature perfectly.
Sparging
- Sparging should be done at around 77c but by the time that the sparge water hits the grain it will have lost some temperature. I am aiming to keep the sparge water at 80C to take account of this.
- I will be using the fly mashing method using my "Phils Rotating Sparger" Sparge water was heated to 80C in HLT using temperature controller to maintain the temperature at 80C.
- I am using a 3 tier set-up with sparge water at the top, then mash tun, then boiler at the bottom.
- The Wort will be collected in batches as the full 40L is too heavy to move. These batches will be transported into the garage where my boiler is waiting.
- After collection about 2 gallons the wort was taken out to the boiler and the gas ring turned on to full.
- In total I have about 8 Gallons to move so this was done in about 4 loads of 2 gallons which worked well.
- Run off into the collection bins was balanced with sparge water being added for about 2/3 of the brew length. I then slowed down the sparge and let the mash tun empty.
- I have been measuring the temperature of the grain in the mash tun during sparging and it seems very low, despite the HLT being maintained at 80C. I think I will need to increase the HLT temperature to get a more efficient sparge.
- Measuring SG the final runnings were still around the 1015 mark, which is Ok but shows that not all the sugars were removed during sparging.
- Note: - Although the sparge temperature in the mash tun was lower than anticipated the overall efficiency was good. If this batch turns out well then I may just leave my sparge temperature "as is".
Boiling
- Boiler is now full and coming to the boil, SG at this point is 1055.
- Took about 30 minutes to come to the boil once moved to the garage. I fitted the lid as this seems to speed this process up.
- Once boiling started the lid was removed and the first batch of hops added. Timer set for 1 hour 30 minutes.
- Using the gas gives much more control and allows me to set the rolling boil without overcooking it.
- Nearing the last 15 minutes, so I have put the Wort chiller into the boiling wort. This ensures that it is fully sterlilised.
- A dessert spoonful of Irish Moss is also added for last 15 minutes.
- The second batch of hops was added for last 10 minutes with the Irish Moss.
- 1 Minute left so added final batch of hops.
- After the full 1 hour 30 minutes the boiler was switched off and started cooler.
- Measured SG and got a reading of 15 Brix (1061), which would mean around 85% efficiency was obtained. Having said this, I think my final volume was down on the planned 40L so this would account for some of this increased efficiency.
Cooling
- Connected up the garden hose pipe to the wort chiller and started the cooling process.
- After about 30 minutes the wort was below 30c but the bottom 2 gallons of wort felt cold. It appears that the copper cooler sits too low in my boiler. To rectify this I have used a piece of wood to raise the copper coils so that they sit at the surface of the wort.
- A further 10 minutes and it was around 20c.
Draining and Aeration
- The cooled Wort was Slowly drained into another bucket.
- The first few pints were gently tipped back into the boiler as these were quite turbid. Once it started to pour clear, it was left to drain slowly.
- Wort seemed to be reasonable clean and free from trub.
- In order to be able to move 40L of wort I used 2 wine fermenters to collect the run off. These are then only 20L each and can easily be moved back inside the house.
- During the draining, the wort also got a good aeration.
- At the end of the draining I experienced an issue. The new hop strainer that I had made either became blocked or became detached from the tap. This caused the draining to stop level with the tap, potentially loosing 7-8L of wort. To reclaim this I used my old bucket in bucket mash tun as a hop back to separate the remaining wort from the hops. This did have the disadvantage of disturbing some trub but this was minimised by pouring the first runnings back through the hop bed. Even so this was not an ideal situation
- Hop Filter Note: My original hop filter was a single piece of pipe with 2mm holes drilled in it. This worked well but I thought it may be a little small for the 50L pot. I had made a larger filter and cut slits in the bottom but this seems to be less efficient. The internal connection of my tap on the 50L pot was a compression fitting but I had tried to use a tap connector. I think the shape of the male 1/2 " part is conical and does not allow a tap connector to get a good seal. I will need to de-solder the tap connector and use a standard compression fitting next time.
- The 50L boiling pot was cleaned and re-sterilised ready for use as a fermenter. This was set up on a heat pad with the temperature controller managing the heating. I have put the probe straight into the pot but am getting worried about this. I think I am going to order a stainless steel probe for next time.
- The two wine fermenters were then emptied into the 50L stainless steel pot giving a good aeration.
Fermentation
- The wort was around the 22C mark, so safe for yeast pitching.
- I did not make a yeast starter as I have had trouble with these in the past, so just sprinkled the yeast on top of the wort as suggested on the packet.
- I left the yeast on top of the wort for around 30 minutes to re-hydrate and then stirred in.
- Fermentation had not really started 4 hours later.
- Fermentation was running well after 24 hours but the temperature had started to climb back up again.
- After 32 hours there is a thick yeast head but the temperature was over 24c so I have opened the window and wrapped a wet towel around the pot to try and cool it.
- 4 hours later and the temperature is back to around 22c.
- Later the same day it was back to 20C.
- 6th June, now 3 full days and the krausen has dropped into the beer. I can see that the wort is still fermenting well as there are many bubbles popping on the surface.
- Refractometer reading was 8.2 brix, which equates to around 1016 SG once adjusted for alcohol content.
- 9th June, Refractometer reading is around 8 Brix so now fermenting very slowly. I have roused the wort slightly and will now transfer to my wine fermenters and put under airlock for another week.
- 11th June - Wine fermenters are bubbling slowly, about once a minute, so nearly finished. I have not got any heat under these vessels so the drop in temperature should encourage the yeast to start dropping out of solution.
- 15th June - Airlock is now bubbling once every 2 minutes or so. The wort has been fermenting for 13 days now so should be nearly complete.
- I will check SG and add finings tomorrow if FG has been reached.
- 16th June - SG measures 7.8 Brix which equates to 1012/1013 SG depending on which formula you use. Using my hydrometer it measure just slightly above 1012.
- The beer tastes a little on the sweet side but has finished fermenting so this I have to live with.
- Once the beer has conditioned some of this sweetness will subside.
Clearing
- 16th June - Added some gelatine to assist clearing. Put boiling water in a jug straight from the kettle, then added 1 packet of gelatine and stirred well. This seems to work Ok as the water is immediately cooled by the glass jug so the temperature is about right.
- Gelatine mixture was gently poured into the beer and then gently stirred. I did not want to stir up and yeast sediment as this will slow the clearing process. As I have 2 wine fermenters I just put half the mixture in each.
- Normally I would use 1 packet of gelatine to 5 gallons of brew but this is probably overkill anyway, so I have split this over the two 4 gallon batches I have fermenting.
- 1 further week under airlock should do the trick.
- 23rd June - The beer is now totally clear and ready to Keg. I have taken a final Refractometer reading and this now shows as 7.6 Brix. Using the morebeer spreadsheet this gives me an SG of 1.012, which is exactly what the original recipe calculations suggested.
Kegging
- 23rd June - As this was a 40L brew, there will be no need to bottle any excess, this will fill 2 Corny's.
- Beer was siphoned from each wine fermenter directly into the clean Corny's.
- The Kegs were sealed with a thin smear of vasseline around the sealing ring and pressurised to 30psi.
- After 10 minutes the gas was purged via the release valves and then re-pressurised.
- This was done a further 3 times to ensure only C02 remained in the Kegs.
- Over the next few days the Kegs were maintained at 30psi to ensure good carbonation.
- Kegs are then stored out in the garage to keep cool for around 4 weeks before the beer is ready to drink. Not sure if I will last this long though.
Tasting Notes
When the beer was transferred to the primary, I tasted a small glass to get an idea of the flavour but was not over impressed. Fermentation was nearly complete so I was hoping to get an idea of the final beer flavour.
23rd June -1 week later - The clear beer tasted very different. There is a residual sweetness from the crystal malt but this has now subsided and produced a warm well rounded malty flavour. This is complemented by a fairly strong but not overpowering hop flavour. I am looking forward to trying the final version, once conditioned and carbonated.
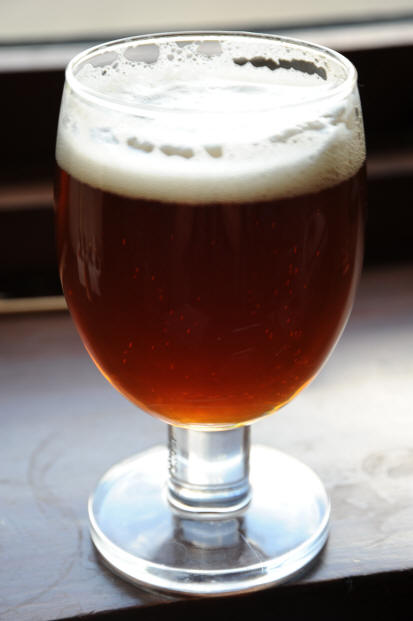
30th June - Could not wait any longer (mainly because I ran out of beer). Beer is lovely and clear with a good head and good head retention. The mouth feel of the beer is great and the flavour/ hop balance is perfect. It seems to be a bit easy to drink but you can taste that this is a strong beer, I think it is around 6% ABV.
If I was to do this recipe again, I would reduce the amounts of malt as it seems a little too strong for my taste. However, it is still quite young and stronger beers require more time to mature, so I will comment again in a few weeks time (if there is any left) Below are a couple of pictures of the finished product mmmmmmmmmmmm!

Final Notes On 40L Batch and New Equipment
The original recipe was for 40L but due to evaporation and further loss in the hops it has ended up as 37L, which is OK. The original estimate for Mash Efficiency was 75% but the new equipment worked well and gained an efficiency of around 82%. Given that the final brew length was lower and the efficiency was higher, this accounts for the increase in OG to just over 1.060 and an ABV of 6.2%. The beer ended up stronger than planned but it tastes good so I will not be complaining.
The Gas burner and boiler SS Pot worked well together. I expected to have a very vigorous boil and need to turn the gas down but this was not the case. The wort boiled vigorously enough but not to the point that the gas needed to be turned down much. The 50L pot is not really big enough for a 40L batch but I managed to end up with 37L so it is workable for a 2 Corny batch.
Biggest fail this brew was the hop straining manifold that I used. This was a new design, which did not work, so I will go back to the old design of a bit of pipe with holes drilled in it. For the 50L boiler, I will need to make a longer hop strainer as the pot is quite wide.
Biggest Wins were:
- New Mash Tun held temperature exceptionally well.
- Mash Tun Manifold and SS level Valve worked perfectly.
- SS Boiler/Pot & Gas Burner all worked as planned.
Contacts
Visit us on Facebook or Email